Some PC games get even more exciting when played using a controller. However, you cannot directly connect a controller to your computer. You need a tool that will act as an emulator for connecting your controller to your Windows PC. This is where you can make use of DS4 Windows.
What is DS4 Windows?
DS4 Windows is the tool that will act as an emulator for connecting your Sony’s Dual Shock 4 (DS4) Controller to your Windows PC.
0.1 What is DS4 Windows?1 How to Fix ‘ds4windows not working’ Error?1.1 Method 1: Check if your DualShock 4 Controller is Enabled from Device Manager.1.2 Method 2: Update DS4Windows.1.3 Method 3: Uninstall your DS4 Controller Device.1.4 Method 4: Re-enable your Controller.1.5 Method 5: Edit DualShock 4 Controller Registry Entry.1.6 Method 6: Uninstall Windows update.1.6.1 Conclusion:
Since Windows has rolled out its Windows 10 update, several users have reported a ‘ds4windows not working‘ error. There could be several reasons which cause this error. Thus, here we are with a list of methods that you can use to eliminate this error and enjoy an uninterrupted gaming experience. READ MORE: How To Delete Win Log Files In Windows 10 (3-Methods) Here, we will list and explain several methods to fix this error. But, you do not have to execute all of them! Start from the first and stop at whichever method works for you.
Method 1: Check if your DualShock 4 Controller is Enabled from Device Manager.
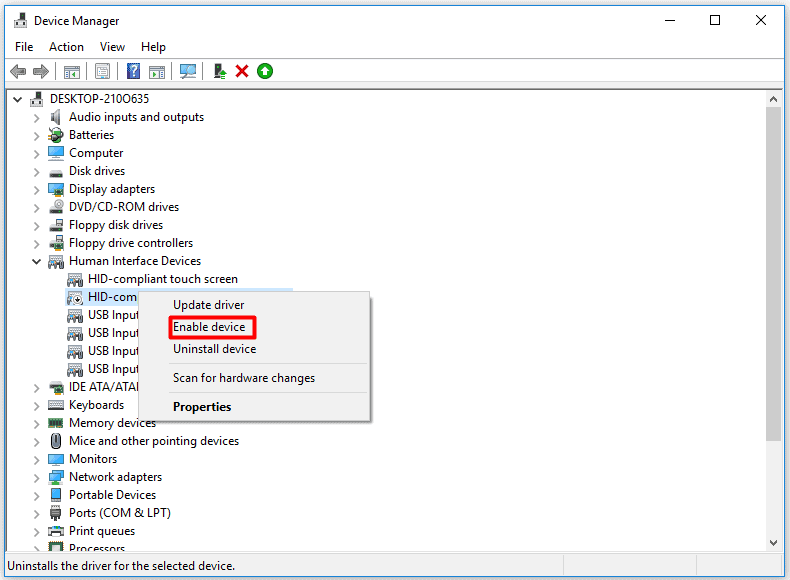
It is possible that this device is disabled from the Device Manager, and hence, it cannot recognize your controller. Follow the steps listed below to fix it. Step 1- Launch DS4 Windows and plug your DS4 controller to your computer. Step 2- From the Windows Start Menu, click on ‘Device Manager‘ from the list. Step 3- Here, expand the ‘Human Interface Devices‘ option by clicking on the right-pointing grey arrow. Step 4- Right-click on the ‘HID-compliant game controller‘ from the list of devices. Then, select ‘Enable Device‘ from the list of options.
Step 5- Now, exit from Device Manager and return to DS4 Windows. Your DS 4 controller should appear in the ‘Controllers‘ tab. If you are still experiencing the same error, go ahead with the next method.
Method 2: Update DS4Windows.
It is possible that the DS4 version you are using is not compatible with the Windows 10 version installed on your PC. Follow the steps listed below to update your DS4 Window. Step 1- On your PC, go to the location where you have all your DS4 Windows files. Step 2- Search for ‘DS4Updater‘ and click on it. Step 3- Let it scan for the latest version of DS4 and download it if required. Step 4- Be patient till ‘DS4 Windows is up to date‘ this message appears on your screen. Step 5- Close the DS4Updater window and relaunch DS4 Windows. Now, check if the error is fixed. If not, go ahead with the next method.
Method 3: Uninstall your DS4 Controller Device.
Once you are done with the preliminary methods, and the error prevails, start with some robust techniques. Follow the steps listed below to uninstall and reinstall your DS4 Controller.
Step 1- Close all your DS4 Windows and disconnect your DS4 controller. Step 2- Press Win + R keys to open ‘Run’ dialogue box and type ‘control panel‘ in it and hit Enter. Step 3- Your Control Panel will be launched. Here, search for ‘Hardware and Sound‘ section and click on it. Step 4- Then, click on ‘Devices and Printers‘ from the list that appear on your screen to get the details of all the devices connected to your PC. Step 5- Now, reconnect your DS4 controller to your PC. You will notice a popup icon of a game controller. Right-click on that icon and click on the ‘Properties‘ option. Step 6- In the properties, click on the ‘Hardware‘ tab located at the top and double click on the ‘HID-compliant game controller‘ option to open its properties. Step 7- Here, in the ‘Driver’ tab, click on the ‘Uninstall Device‘ option to uninstall your controller. Again, disconnect your controller from your PC. Step 8- Launch DS4 Windows on your PC and reconnect your DS4 controller to it. This method should fix your error. If not, try using the next method. READ MORE: Ralink Linux Client: Why Ralink Showing Up In Windows Network
Method 4: Re-enable your Controller.
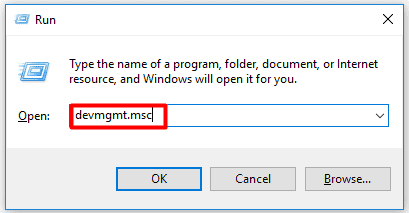
Step 1- Press Windows + R keys to open the ‘Run‘ dialogue box on your PC. Here, type devmgmt.msc and press Enter.
Step 2- Click on the arrow with ‘Human Interface Devices‘ and double click on the ‘HID-compliant game controller‘ option.
Step 3- Enable it to get your controller detected by DS4 Windows.
Method 5: Edit DualShock 4 Controller Registry Entry.
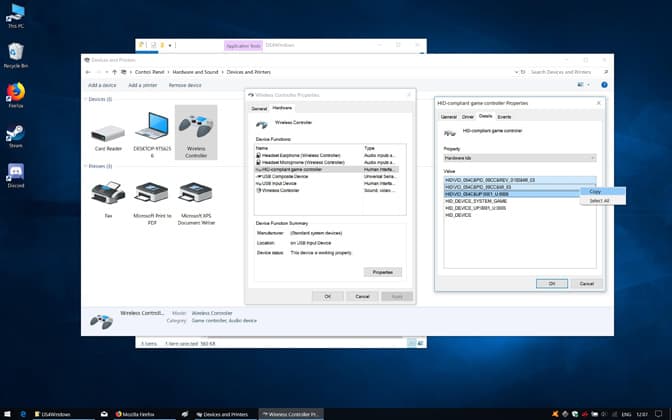
This is the most technical method. Thus, you need to be careful with is the process. Step 1- Plug your controller to the PC and close all DS4 Windows. Step 2- Launch the Control Panel of your computer and select ‘Hardware and Sound‘ option. Step 3- Then, select ‘Devices and Printers‘. In the ‘Devices‘ section, click on ‘Wireless Controller‘ » ‘Properties‘. Step 4- Click on the ‘Hardware‘ tab and then, click on ‘HID-compliant game controller‘ from the Device Functions list. Step 5- A new window will appear on your screen, click on the ‘Details‘ tab on this window.
Step 6- Select ‘Hardware ids‘ from the ‘Property’ drop-down list and select the first three entries in the ‘Value‘ section. Copy it and paste these entries as a backup. Step 7- Right-click on the Start menu and select ‘Run‘ and type ‘Regedit‘ in it and hit Enter. Step 8- In the Registry Editor window, expand HKEY_LOCAL_MACHINE » System » CurrentControlSet » Services. Step 9- Now, look for HidGuardian » Parameters. Double-click on the Affected Devices listed in the left-section. Then, copy the value which you had earlier copied and paste it in this list and click on OK. Step 10- Restart your PC, launch DS4 Windows, and connect the controller. Please execute each step carefully as missing out on any one of the steps will lead to failure in fixing the error using this method.
Method 6: Uninstall Windows update.
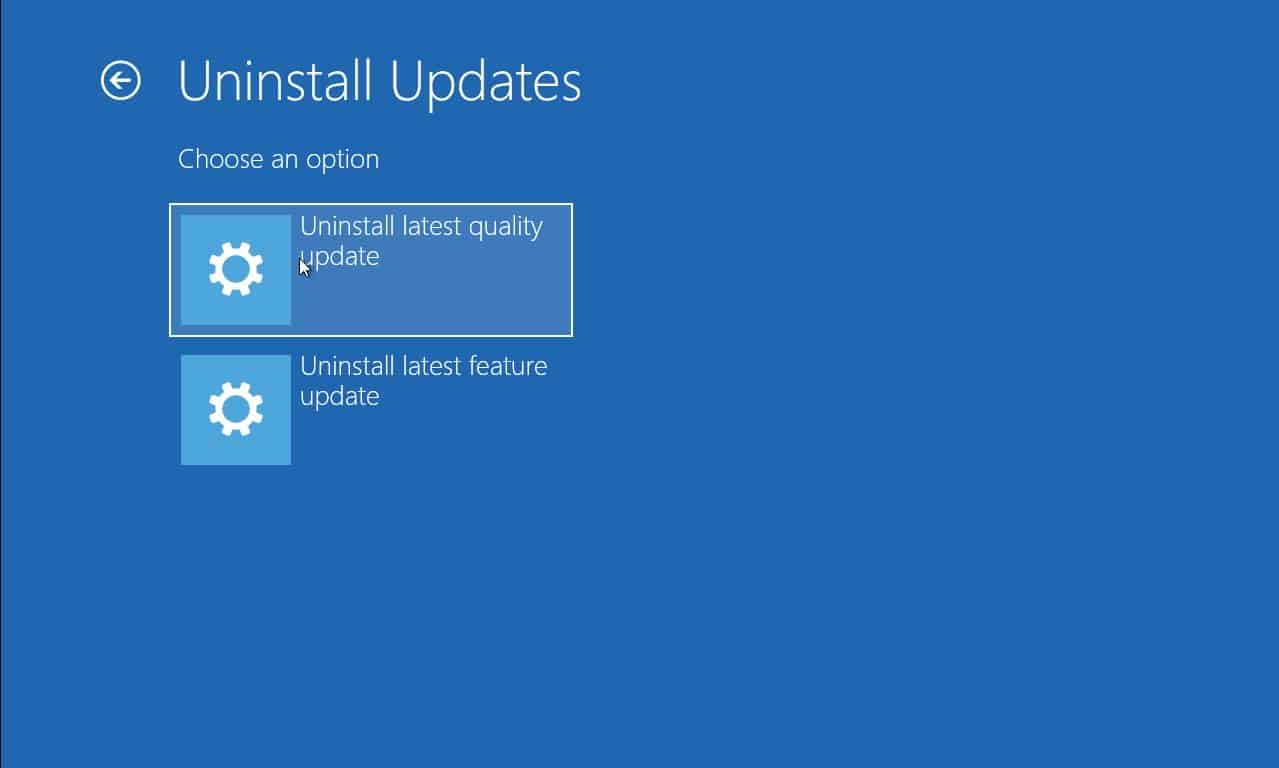
If none of the above-listed methods fixes this error, try uninstalling your Windows update. The steps involved in this method are listed below. Step 1- Press Windows + I keys simultaneously on your keyboard. This will launch the settings. Step 2- In Settings, click on the ‘Update and security‘ option. Step 3- Go to ‘Windows Update‘ from the list on the left and then, click on ‘View installed update history’ option. Step 4- From the new window, click on the ‘Uninstall updates‘ option to get the list of all the installed updates on your computer.
Step 5- Search for the latest update after which this ‘ds4windows not working‘ error started appearing. Once recognized, click on it and uninstall it. Go through the un-installation process till the end and restart your PC once the process is completed. READ MORE: Enable and Disable Service Host Superfetch in Windows 7/8/10
Conclusion:
These are some of the most useful methods which you can use to fix the ‘ds4windows not working‘ error on your PC. We are confident that one of the above-listed methods will fix this error. If you have any queries regarding the methods listed above or if you know of any better method to fix the ‘ds4windows not working‘ error, then please let us know about it in the comments section below. I hope you can help me.
Δ
