That’s the reason why thousands of people are started switching to Starlink. Also, many of them are already switched to Starlink, but they didn’t know how to access the Starlink router settings. But now, no worries here’s the guide that you need. So, let’s get started with them.
What is a Starlink Router?
A Starlink router is an extremely powerful and sophisticated piece of equipment that makes managing your home network easier. Several devices on your network can share files, printers, and internet connections. In addition to providing security features, the Starlink router provides network protection against unauthorized access.
What Are The Features of Starlink Routers?
You can manage your home network effectively with the Starlink router with its array of features. Starlink routers have the following features:
Internet connection sharing: You can share your internet connection on your home network with multiple devices via the Starlink router.Security features: Keeping your home network safe from unauthorized access is made possible by the Starlink router.File sharing: With the Starlink router, you can share files on your home network among multiple devices.Printer sharing: Share printers across your home network using the Starlink router.Customization options: Each Starlink router has a multitude of customization options that can be tailored to meet your specific needs.
How To Access Starlink Router Settings
So, here are some methods using which you can easily access the Starlink Router settings to make some changes to it.
1. Using Starlink App
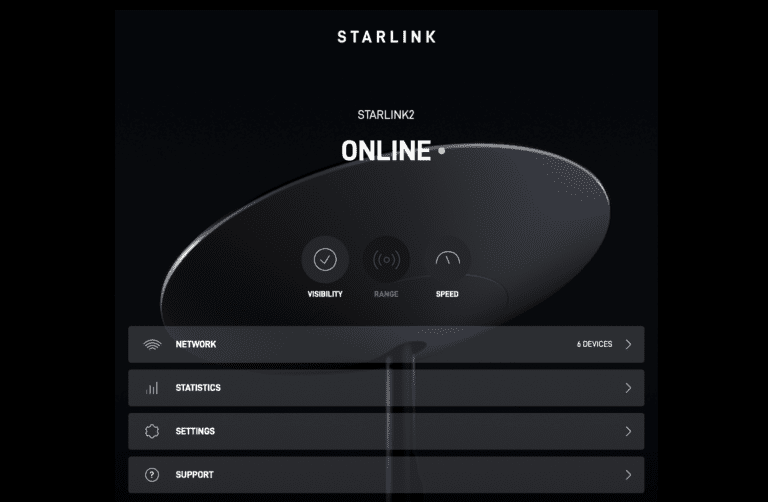
You can easily manage or access your Starlink router settings through the Starlink app. There are iOS and Android apps available for Starlink. Start by searching for Starlink in the app store if you haven’t already done so. Be sure that you are connected to your Starlink wireless network to access your router’s settings. Additionally, make sure you are logged into your Starlink account. In the dashboard, you’ll find the app open.
Here, you will find important information, such as the Starlink status. You can also check your network settings, test your internet speed, and check for obstructions. In the Settings section, you can find advanced router settings – for example, how to split the 2.4GHz and 5GHz WiFi networks.
2. Using Web Browser
Your Starlink router can also be accessed through a web browser running on a device on your Starlink network. There is no need to install an app for this method; just use a web browser to perform the action. Your web browser will need to be configured with the following IP address in order to access Starlink: http://dishy.starlink.com/ Instead of using the dish IP address, you can use the Starlink dish IP address: http://192.168.100.1 To access the Starlink router page, use http:// instead of https://. Your network statistics might not be displayed automatically if you use a third-party router with enabled bypass mode. When you are in bypass mode, you will not be able to access other Starlink router options: http://dishy.starlink.com/statistics
Starlink’s web admin dashboard has a similar layout and features, but some settings and features cannot be accessed through the browser.
Does Starlink offer static IP addresses?
Those who use the Business tier of Starlink are eligible for static/public IP addresses. It is not possible to obtain static IP addresses for Residential or other service levels.
Why can’t I get a static IP for Residential?
Through a system called CGNAT, Starlink provides dynamic IP addresses to Residential customers. With the growth of the internet worldwide, it has become impossible to provide everyone with a unique IPV4 address. The solution to this problem is CGNAT, a technology that is used by ISPs to resolve this issue. Basically, it enables ISPs to pool IP addresses and then assigns them dynamically as needed to customers. Consequently, your public IP address (what the internet sees) will change often. Using a VPN or online gaming can lead to connectivity issues. Due to the shortage of IPV4 addresses, Starlink charges a premium for the option of reserving your own IP address. Because of this, you’ll need to subscribe to Starlink’s Business plan in order to receive one.
Is it possible to use ethernet with Starlink?
There is no problem using ethernet with Starlink. Your modem must be connected to the “WAN” port on the Starlink router in order to accomplish this. Afterward, connect another Ethernet cable to the Starlink router’s numbered ports and connect the computer.
How far can a Starlink Router go?
There are two 2.4 GHz and five GHz channels on the Starlink router. 5GHz travels a shorter distance but provides faster internet, while 2.4GHz travels a longer distance but provides slower internet. On the other hand, 2.4GHz internet speeds fluctuate between 20Mbps and 30Mbps. It depends on where you place the router for the Starlink router to have a long range. There is an effective range of 200 feet for the router on average. However, it is important to realize that trees, branches, walls, and bricks will impede the WiFi range and speed. The router shouldn’t be placed in the basement or garage because it will slow down your internet connection. You can use it from a distance by connecting to the 2.4GHz network. It will take longer to connect to the internet, but you will have access. You’ll get better speeds inside your home by connecting to the 5GHz network.
From Author’s Desk
So, that’s how you can easily access the Starlink Router settings. We hope that you find this article helpful. Furthermore, in case you need more info, comment below and let us know. ALSO READ:
How to Fix Starlink Disconnected ErrorHow to Find Out If Starlink Internet Is Available In Your AreaHow to Fix Routerlogin.net Not Working192.168.1.1 Login Page, Username, Password, and WiFi Settings192.168.1.25 Username, Password, and WiFi SettingsHow To Fix Spectrum Router Red Light Issue
Δ